- Drag+Drop video files or folders on to the green field or on to the batch list box. To remove items from the batch list, drag+drop the items on to the red field.
- Example: you have a folder "Movies" with various sub folders like action, thriller, docu etc. and you want them all on the batch list exept for "docu". Drag+drop "Movies" on to the green field and then "docu" on to the red field. Now after review of your batch list you may decide that you don´t want five items from the folder "thriller". Mark these 5 items in the folder and drag+drop them on to the red field.
- Single items can also be removed from the batch list with a right-click on the list item.
- Using the file filters you can include or exclude types of files in your batch list:
Blu-ray and DVD:
- If an unprotected BD or DVD is in one of the disc drives on the master computer or the slave computer(s) it will automatically be scanned for processing data and added to the batch list. Scan and conversion of discs on the slave computer(s) is done there but controlled from MkvBatcher on the master computer. If for example you have 3 computers with 2 disc drives each, you can convert 6 unprotected DVDs or Blue Rays simultaneously. All controlled from the master.
- If you do not want to convert discs, remove them from your drives or de-select the file filter "DISC".
- Note: MkvBatcher and the conversion engine of "Handbrake" behind it can only handle unprotected discs!
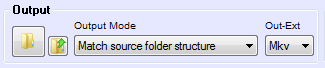
- The folder button opens a dialog for changing the output directory. The smaller button opens the output directory.
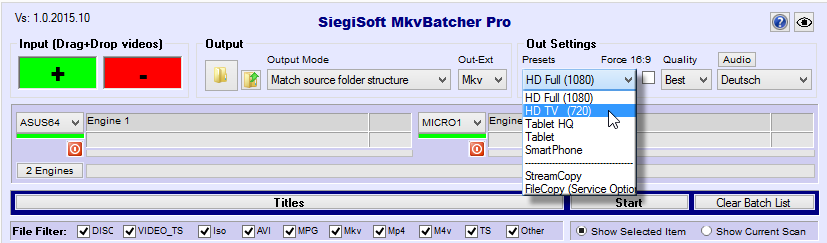
- The dropdown combo "output mode" has the options:
1. 120 secs Test Clips Lets you test the outcome before you invest hours of conversion time. 2. All files into one folder Useful if you convert a selection of movies for your tablet or smartphone. 3. Match source folder structure This would be the best mode as a default. Your output will have the same structure as your input. So if your originals are all in one folder, the output will be all in one folder. If you have one folder for each movie with pics and detail-XML in it, your output will be like that. 4. Scan only (no output) As the scanning is done in the background while other files are already being converted, you do not need this mode for normal operation. It is used for "Duration Edit" or in any other Scan-edit-convert context.
- The dropdown combo "Out Extension":
- Has the options: Mkv, M4v and Mp4. Mkv is the default format. Mp4 is well supported by tablets and handys. M4v is for Apple gear (but Mp4 works on my Ipad and Iphone too).
Main language Alternative language
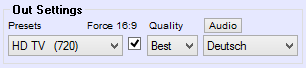
- The dropdown combo "Presets" has the options:
- Note: All modes for resolution only downscale if required. They never upscale!
1. HD Full (1080) 1920x1080
- These presets are for home intertainment gear.
- Out extension is Mkv. Audio is 5.1 ch if possible. Quality setting is "best".
- All presets for resolution only downscale (never upscale). So you actually select the maximum out resolution. If you select e.g. "HD Full 1080", a DVD will still be converted with its native low resolution.
- If you always want to preserve the full source resolution, just do everything with setting "Full HD 1080". If you are happy with 1280x720 for all your HD material, just do everything with the setting "HD TV 720".
2. HD TV (720) 1280x720 3. Tablet HQ 720x400
- Tablet and SmartPhone
- ... are presets with resolutions fitting the purpose and a slightly lower quality setting (except Tablet HQ) as well as "force 16:9" and "all files into one folder". The out extension is Mp4. Audio is 2 ch (mixdown to Dolby Pro Logic II).
4. Tablet 480x270 5. SmartPhone 320x180 6. StreamCopy No conversion is done. So this option is fast. But no file size reduction, black bar cropping or filtering like deinterlacing is possible. So unless you need for some reason the Mkv format, you´re not really gaining something with it. The relevant streams for video and audio are just repacked into the Mkv container format. Note: The files must be scanned first, so that the streams are identified. First use output mode 4 (Scan only) then change to output mode 2 or 3 for the actual StreamCopy. 7. FileCopy
- FileCopy is a service option that may come in handy in the context of re-organizing a movie selection or if you want to copy a certain selection of titles on to a removable drive for some reason. It just copies whatever you put on the batch list. DVDs as VIDEO_TS folders are converted to ISO files (only affects the target folder, source remains as VIDEO_TS).
- Output modes 2 or 3 are supported.
- The TickBox "Force 16:9" (CinemaScope --> Flat TV):
- If you want no top and bottom black bars on CinemaScope material (wider than 16:9), the option "force 16:9" adjusts the crop values left and right so that the video is 16:9 after conversion. The option does not affect 4:3 material (the old tv format with black bars left and right on a flat screen)!
- Some background info: Cropping wide material left and right to get to 16:9 will normally leave the essence of the picture intact because the action happens in the middle of the picture. So I personally use it all the time as I don´t like the black bars. A CinemaScope BD is 1920x1080. But the content (without black bars) is only 1920x800. So if you crop away a few trees left and right you have 1424x800 (16:9). Not much more than the 1280x720 of HD TV. That is why I favour the preset "HD TV" and the option "Force 16:9". In short: you get a format filling picture with excellent quality and a small file. But if you always want to preserve the full original content in your archive, just unselect "Force 16:9" once and for good and do everything with "HD Full".
- Note: If the ratio of the source material is only slightly off 16:9 (very small black bars), "force 16:9" is applied to get a format filling picture, even if the option is not selected. In a lot of cases these small black bars in source material are just a side effect of previous conversions e.g. by you or the TV station (divide by 16 context).
- The dropdown combo "Quality":
- The options are: good, better and best. Handbrake (the conversion engine) offers a wide range of settings for the quality. The results go from absolutely lousy to the point where the out file is larger than the in file. After a lot of testing I settled for the following range:
- "Good" gives you a small file with a quality that is still quite acceptable (no worse than a lot of TV material and some lesser quality DVDs)
- "Better" a good compromize between file size and quality.
- "Best" is the setting where I found, that higher settings will basically only increase the file size but really not improve the quality any further.
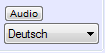
The dropdown combos "Audio (Language)":
Main language Alternative language - The headline button "Audio" toggles between the setting for the main language and the alternative language (audio track used if the main language is not found).
- As per your setting for the main language and the alternative language, MkvBatcher finds the right audio track during the automatic scan for processing data.
- If 5.1-CH is not found, 2-CH is selected. If the main language is not found, the audio track of your alternative language is taken and subtitles in the main language are added.
- The button "Start" starts the batch conversion process. It changes status to "Pause" if pressed. "Clear Batch List" does what it says.
- The button "Titles" toggles the batch list between showing "Titles", "InFiles" or "OutFiles".

- With the dropdown combo you can select the host computer for that engine (or "none"). In a single computer setup it will only show the local computer and none. In a multi computer setup it will also show all other computers in the LAN that have MkvBatcher_Slave.exe set up.
- The red button aborts the current conversion of that engine and deletes the (crippled) out file. This button is only active in pause mode (see start button).
- The green bar indicates the status of the engine host computer. Red means that for some reason communication with MkvBatcher_Slave.exe on that computer is interrupted and no conversion jobs will be assigned during a batch run. Note: during a conversion run the bar may turn red temporarely for a short while. This just means, that due to network load peaks communication is temporarely disrupted. After a few seconds it turns green again. This is no problem. Should the bar stay red permanently, there is a problem (slave offline, network problem, MkvBatcher_Slave.exe crashed etc.). In that case you need to go to the slave computer to fix the problem. The red abort button will then not work as there is no communication between master and slave.
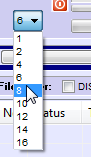
The Engine Quantity Selection:
- Pressing this button, located next to the main progress bar, unhides a dropdown combo for the selection of 1 - 16 engines.
- The selection is only possible if the batch list is empty because MkvBatcher restarts after a change to do all required adjustments. MkvBatcher_Slave(s) running on other computers will automatically and on the fly adjust to the new engine quantity.